This article was written by Jim Paull, ERS, and Praga Meyyappan, ERS.
What is the optimum orientation for a solar module to achieve maximum performance? If only this question had a simple answer! Convention dictates that it should be tilted approximately to the same angle as the site’s latitude and face due south in the Northern Hemisphere and due north in the Southern Hemisphere. But that’s not always how modules are mounted. In fact, it’s not the case in many solar installations.
Why?
Tilting your module to the latitude of your location allows for the most efficient results of your system if you have plenty of space available, such as a ground-mounted solar farm. But elsewhere, you may see all sorts of tilts and orientations. One of the issues with modules tilted at a high angle is that they shade the ones behind it. To avoid shading, rows of modules are spaced apart, which we’ll discuss later in this article. This works well in open spaces but not on buildings, given the small square footage of most roofs.
How are buildings different?
If you’re mounting modules on a tilted roof, the installation is constrained to the slope and orientation (azimuth) of the roof.
However, many commercial roofs are flat. This poses two challenges:
- If you need a lot of space between modules, you must reduce the number of modules you can install.
- Flat roofs are sealed with a membrane. If you were to install modules at a high tilt angle, wind loading would require that the module racks be physically connected to the roof structure, which is inadvisable when it involves penetrating the roof membrane.
That’s why modules on flat roofs are installed at minimal tilt (typically 10 to 12 degrees) using racks that are ballasted (weighed down with concrete blocks and such) so they don’t fly away.
At low angles, much less space is needed between modules, so you can cram more of them on a roof. The small tilt also lets them shed water and dirt.
So, how much energy do you “lose” by installing them at low angles?
Not much, at least theoretically. As shown in Figure 1, annual energy production is only about 10% less than if the modules were installed at the optimum lift. Having said that, there will be a big difference in the timing of output over the course of a year, with the lower angle modules putting out more during the summer and a lot less in the winter (especially if the modules are covered by snow).
Figure 1. Solar Harvest Relative to Tilt Angle
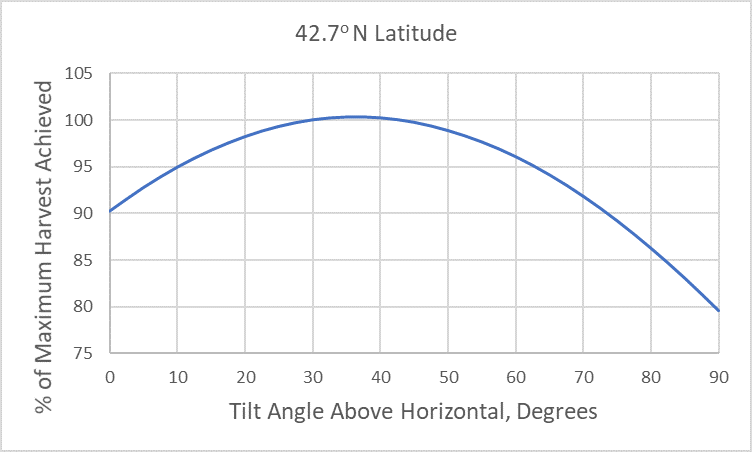
As you can see from Figure 1, there is a sizable decrease in solar harvest at tilt angles higher than the latitude. However, sometimes modules are installed this way, such as when applied to the exterior walls of buildings (building integrated photovoltaics, or BIPV). Although kWh harvest per unit area is considerably lower, available wall area in tall buildings is much greater than their roof area, so the total kWh yield can be significantly greater for wall-mounted BIPV than for roof modules.
What’s the effect of compass direction (azimuth)?
Azimuth angle is the angle of the panel with respect to due north measured in clockwise direction. Figure 2 provides a very high-level overview.
Figure 2. Azimuth Angle Summary

Ideally, you want the panel to point to the sun and therefore increase the surface area normal to the incident rays. This would mean aligning the panels along the north-south axis. At the equator, where the sun is pretty much overhead, the modules should be installed flat and azimuth doesn’t matter much.Now, obviously, for the Northern Hemisphere, due south is best. But east and west orientations aren’t bad either, as is shown in Figure 3. You can even get some production out of north-facing modules in the Northern Hemisphere, especially in regions with lots of diffuse (scattered) light.
Figure 3. Solar Harvest Relative to Azimuth Angle
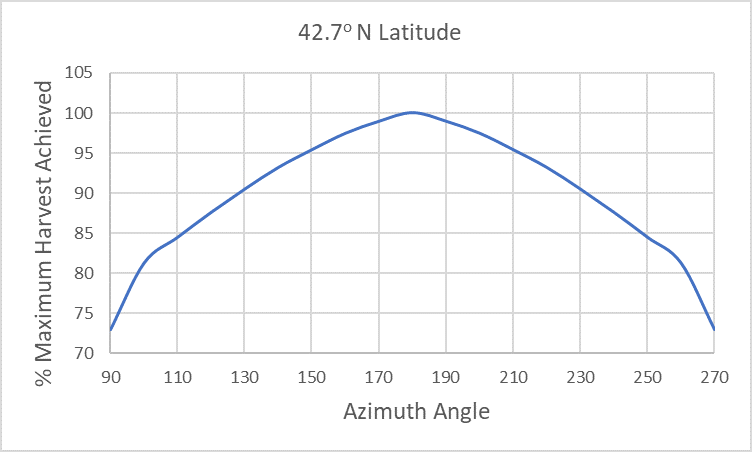
As you can see, the curve of Figure 3 is a little wonky. This is because the three-dimensional relationship between the sun azimuth, altitude angles, and the plane of the module is much more complex than the geometry due to the relatively simple change in tilt angle. The discontinuities in Figure 3 are because, at some angle, the sun starts to be behind the module.
Figure 3 assumes tilt at latitude. However, if the system is installed with a westerly or easterly orientation, output can be improved by a higher tilt angle. If the goal is to reduce peak load at afternoon peaks, for example, it may be desirable to face the modules more toward the west.
Since the optimum tilt angle is high at higher latitudes, it’s important to orient the module to the south to achieve maximum solar harvest.
Finally, how is spacing determined to avoid shading?
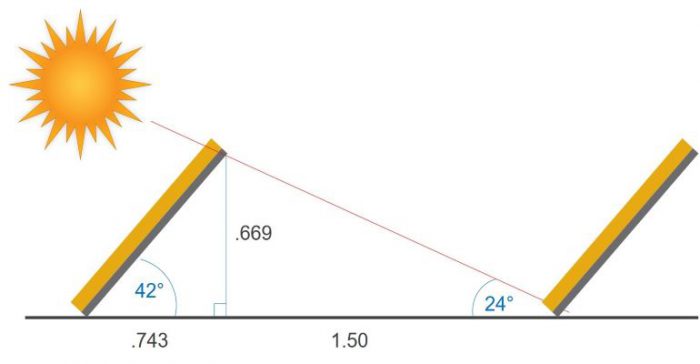
Theoretically, modules should be spaced such that they are not shaded at noon of the winter solstice. Figure 4 shows that geometry.
Figure 4. Module Geometry on December 21, 42o Latitude

In practice, modules are scrunched together closer than this when space is limited. It makes more sense to pack in more modules and forgo the little that’s lost to shading on bleak winter days. For low-angle modules, they may be covered with snow anyway.
Table 1 is a very rough rule-of-thumb for how much PV can be installed per square foot of area. These values are crude, as it depends on module efficiency and latitude; they’re also rounded numbers to be remembered easily. But it works for a quick preliminary assessment. As a mnemonic, just remember July 10, 2015.
Table 1. Approximate Power Density for Module Installation Type at 42o Latitude
| Type of Installation | Approximate Power Density, W/ft2 of Available Space |
| Ground-mounted installed at latitude tilt | 7 |
| Low-angle ballasted installation on flat roof | 10 |
| Flat on angled roof or building-applied | 15* |
*Not dependent on latitude
The power densities of Table 1 assume an irradiance of one sun (1,000 W/m2). One sun is approximately what you get after the sun’s power of 1,366 W/m2 goes through the earth’s atmosphere. So, unless the module is pointing right at the sun, the power it will realize will be less.